Showing posts with label beach decor. Show all posts

Wednesday, November 16, 2016

Personalized Gifting!

Hello y'all! For those of you who don't already know, I'm also a Scentsy consultant!  Today I'm sharing a quick DIY using a Scentsy warmer called "Charmer."  I needed a gift last Christmas for someone who loves flip flops.  I couldn't think of what to get her, knowing that she is gifted a lot of flip flop stuff and this idea popped into my head!  I found someone on Etsy that makes flip flop decals.  Once I completed the flip flop warmer, I really wanted one myself!  I ordered my monogram from the same Etsy shop and made my own!  They both turned out really pretty!  This is a great idea if you're looking for something personalize this holiday season!!!


If you are interested in the Charmer Scentsy warmer, please visit my website at meganheinze.scentsy.us

For the Etsy shop where I purchased my decals: https://www.etsy.com/shop/DocksideDesign


Tuesday, November 15, 2016

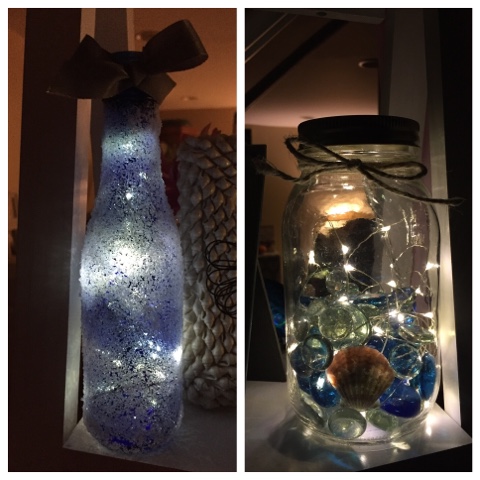
Luminaries

Hello! I figured after two days of decor posts, I'd feature a craft today! 

What you'll need for the wine bottle craft:
-Epson Salt
-Ribbon
-Wine bottle
-Battery operated lights (recommend finding ones with a timer)
-Mod Podge Spray

What you'll need for the mason jar craft:
-Mason jar
-Seashells
-Glass pebbles 
-Battery operated lights (recommend finding ones with a timer)
-Twine

For the wine bottle craft: Remove all labels, I soak the bottle in warm water and use a Brillo pad to scrub away and residue.  Once the bottle dries, spray with Mod Podge and immediately roll into Epson salt.  I poured the Epson salt on a paper plate to make it easier to roll.  I then stuffed the lights down into the bottle.  Once you let the bottle sit for a little while, the salt and Mod Podge will set and the salt will hold.  I added a little ribbon at the top.  The lights came with a battery pack and it has three different settings.  This piece didn't fit inside the bottle, so I have it tucked behind the bottle and you can't actually see it!  I found a very inexpensive set of lights at Walmart for this craft.  I believe they were only $5.  Only downside is that the wiring is actually green, you can't tell in this craft, but if you're using clear glass you would be able to see. 

For the mason jar craft: I filled the bottom of the mason jar with the desired amount glass pebbles.  I strategically placed the shells around the inside of the glass, using the glass pebbles to hold them in place.  Using twine, I tied a bow around the top of the jar.  I unraveled the strand of lights and added to the jar.  This strand of lights also has a battery pack that didn't fit into the glass jar, so it's sitting behind the jar.  It also came with three settings.  The only downside to this set of lights was the price, I paid about $12 for this strand from Michael's.  I liked the silver wiring on this strand for this craft.  I have both luminaries set on a timer. 

I'm very pleased with how both luminaries turned out!  Have you made any luminaries of your own? 


Sunday, November 13, 2016

Beachy Decor

Hello!  As many of you know, my living room has a relaxing beachy theme.  Today I'm featuring photos from my old townhouse to show a little insight to my crafting decor inspirations. These photos aren't "picture perfect" and I probably should have tidied up beforehand, but I still wanted to share!


Sunday, October 9, 2016

My heart...

Not even a month into the fall and I'm already missing the warm weather and the beach!!! 


Sunday, September 4, 2016

Sand Souvenirs!

Alright!  Time to get back to crafting! I was on a crafting binge and I had to take a little break!  I thought this was a fun craft for Labor Day weekend!  As the summer winds down and lots of families are vacationing at the beach, this is something fun and easy anyone can do!  

What you'll need:
-Glass bottle (I used a wine bottle, beer bottle, and patron bottle)
-Ribbon
-Seashells
-Decal
-Scrap booking paper
-Mod Podge Glue
-Gorilla Glue

*Just a helpful reminder, don't throw away the cork or bottle cap! You will need this!*


First, you have to drink the beverage in order to empty the bottle!  I would then suggest cleaning out the glass bottle with water and soap.  Once the bottle is clean and ready to go, simply take it to the beach and fill with sand!  You can also fill a zip-lock bag with sand and then cut the bottom corner of the bag to fill the bottle.  Because some of my bottles were so big, I just took them to the beach with me and scooped the sand right into the bottle.  Simply stick the cork in the top or use gorilla glue to reattach the cap.  Make sure you've secured your bottle of sand properly for the ride home! 


I try to fill a bottle each year I go to the beach, I think it's a fun little souvenir and it fits perfect in the decor for my living room!  Once I'm home from my beach vacation, I'll embellish the bottle. I gather seashells from the beach and string them on ribbon and tie around the neck of the bottle. I have also used scrap book paper and mod podge glue to decorate the bottle! Hope y'all enjoyed! Happy crafting!


Monday, August 29, 2016

Mermaid Souvenirs!

My family just got back from a beach vacay and brought me home a few souvenirs! They are perfect!


Monday, August 22, 2016

Flip Flop Welcome Sign!

Hello!!!

Here's another Flip Flop craft!

What you'll need:
-4 Pairs of Flip Flops
-Hot Glue
-Gorilla Glue
-Letters or Paint for "Welcome"
-Small piece of wood
-Wire or Ribbon


To start, I layered the flip flops and glued them into place.  I used both hot glue and Gorilla Glue to secure the flip flops together.  The crazy glue was for long term hold where as the hot glue was for an instant hold.  I find that when you craft with hot glue, it doesn't hold up well in direct sunlight.  I used Gorilla glue to secure the letters "Welcome."  If you don't have letters, you can also use paint to write the "welcome" letters across the flip flops.  I then attached a small piece of wood to the back where you'll be able to attach a wire or ribbon which can be used to hang the welcome sign.  Hope y'all enjoyed!!!


Friday, August 19, 2016

Mermaid Photo Frame

Super excited about this craft! Here we go! 
What you'll need:
-picture frame
-sea shells
-hot glue
-star fish
-pearls 
-paint 
-glass pebbles


I purchased frames from the dollar store, just in case this didn't go as planned, I wasn't out a lot of money!  We started by painting the picture frames. Once the frames were dry, we used hot glue to secure the shells, glass pebbles, and pearls. Then- add a photo! And you've got yourself a mermaid frame! 


Happy crafting, y'all! 


Tuesday, August 9, 2016

Shelly Monograms!

I'm crazy about the beach and monograms!  If you are too, then you'll love this craft!  Way easier than I expected!

What you'll need:
-Letter (I used "H" for my last name)
-Paint
-Sea Shells!
-Paint Brush
-Hot Glue

My letter was a natural wood color and I knew I wouldn't be able to completely cover every inch with shells, so I painted the letter white first.  After the paint was dry I began placing shells and gluing.  I didn't map it out, I just worked each piece one at a time.  
I was surprised everything fit together as nicely as it did.  My biggest concerns were that the hot glue wouldn't hold the shells and that the shells wouldn't fit together well. Happy to report those weren't issues! I normally use shells that I collect at the beach, but for this craft I wanted a better variety of size, shape, and style.  I purchased these shells at Walmart, the shells were about $4 cheaper at Walmart than Michael's.
It fits perfect in my living room that's decked out in beach decor!  I have so much fun making these crafts and I hope you're enjoying them as well!!! Thanks for stopping by!