Sunday, December 11, 2016

Wine Bottle Craft

Hello!  I always see cute wine bottle crafts on Pinterest and I finally took a shot at one!

What you'll need:
-Wine Bottle
-Mod Podge Spray
-Glitter
-Ribbon
-Hot Glue Gun
-Sticks  
-Tape


Once I had an empty wine bottle, I removed the labels using warm water and a brillo pad.  I then used tape to section off where I wanted the glitter to be applied.  I sprayed the area with Mod Podge spray then rolled the bottle in glitter and did another coat of Mod Podge.  I added ribbon to the base and neck of the bottle and secured with hot glue.  I found glitter embellished sticks at Michael's that fit perfect in the bottle.  I've been testing other wine bottle crafts, but I can't share until after the holidays! Happy Crafting!


Saturday, December 3, 2016

Mason Jar Craft

Hello!!! I love mason jar crafts, they are incredibly simple and always turn out adorable!

What you'll need:
-Chalkboard paint (I used White)
-Ribbon
-Flowers
-Hot Glue Gun


Step one, paint your mason jar. Step two, wrap ribbon around jar and secure with hot glue. Step three, add flowers (real or fake).  Like I said, really simple! 


Happy crafting!


Wednesday, November 23, 2016

Sunday, November 20, 2016

I love Ellies!!!

Happy Sunday!  I love this craft because you can definitely make it your own!  It's a simple little mason jar craft!

What you'll need:
 -Mason Jar
-Animal (I chose an Elephant)
-Paint (I used spray paint and acrilic)
-Ribbon
-Glue
 

I started this craft by spray painting the elephant and lid of the mason jar.  I found the perfect sized animals at Michael's in the children's toy isle.  Once everything was dry, I first glued the two lid pieces together and then glued the elephant to the lid.  I painted the mason jar with Martha Stewart pearl paint.  To polish off the jar, I tied a ribbon around the neck!  I have no clue what I'm going to put in the jar, but I love it!  I was thinking it would be great for hair ties and pins!  Hope y'all enjoyed! 


Wednesday, November 16, 2016

Personalized Gifting!

Hello y'all! For those of you who don't already know, I'm also a Scentsy consultant!  Today I'm sharing a quick DIY using a Scentsy warmer called "Charmer."  I needed a gift last Christmas for someone who loves flip flops.  I couldn't think of what to get her, knowing that she is gifted a lot of flip flop stuff and this idea popped into my head!  I found someone on Etsy that makes flip flop decals.  Once I completed the flip flop warmer, I really wanted one myself!  I ordered my monogram from the same Etsy shop and made my own!  They both turned out really pretty!  This is a great idea if you're looking for something personalize this holiday season!!!


If you are interested in the Charmer Scentsy warmer, please visit my website at meganheinze.scentsy.us

For the Etsy shop where I purchased my decals: https://www.etsy.com/shop/DocksideDesign


Tuesday, November 15, 2016

Luminaries

Hello! I figured after two days of decor posts, I'd feature a craft today! 

What you'll need for the wine bottle craft:
-Epson Salt
-Ribbon
-Wine bottle
-Battery operated lights (recommend finding ones with a timer)
-Mod Podge Spray

What you'll need for the mason jar craft:
-Mason jar
-Seashells
-Glass pebbles 
-Battery operated lights (recommend finding ones with a timer)
-Twine

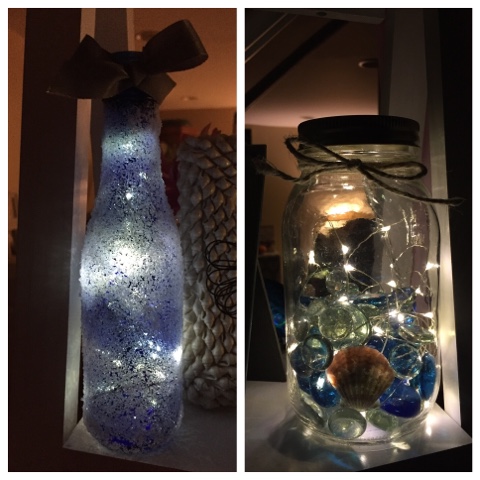
For the wine bottle craft: Remove all labels, I soak the bottle in warm water and use a Brillo pad to scrub away and residue.  Once the bottle dries, spray with Mod Podge and immediately roll into Epson salt.  I poured the Epson salt on a paper plate to make it easier to roll.  I then stuffed the lights down into the bottle.  Once you let the bottle sit for a little while, the salt and Mod Podge will set and the salt will hold.  I added a little ribbon at the top.  The lights came with a battery pack and it has three different settings.  This piece didn't fit inside the bottle, so I have it tucked behind the bottle and you can't actually see it!  I found a very inexpensive set of lights at Walmart for this craft.  I believe they were only $5.  Only downside is that the wiring is actually green, you can't tell in this craft, but if you're using clear glass you would be able to see. 

For the mason jar craft: I filled the bottom of the mason jar with the desired amount glass pebbles.  I strategically placed the shells around the inside of the glass, using the glass pebbles to hold them in place.  Using twine, I tied a bow around the top of the jar.  I unraveled the strand of lights and added to the jar.  This strand of lights also has a battery pack that didn't fit into the glass jar, so it's sitting behind the jar.  It also came with three settings.  The only downside to this set of lights was the price, I paid about $12 for this strand from Michael's.  I liked the silver wiring on this strand for this craft.  I have both luminaries set on a timer. 

I'm very pleased with how both luminaries turned out!  Have you made any luminaries of your own? 


Monday, November 14, 2016

Happy Fall Y'all!!!

Fall is one of my favorite seasons!  Yesterday I gave you a peek into my living room decor and today I thought it would be fun to show you my fall decorations!  I typically update decorations from season to season.  I'm really getting excited for Christmas and I don't think I can wait much longer to decorate my house!  I had to get these photos taken asap! 


I bargain shop for seasonal decor.  Above you'll notice two votive candle holders, I purchased those from the dollar store and I use battery operated tea lights in them.  A few pieces were purchased from the dollar buys section in Target and the others were gifts.


I always go to Michael's or Kirkland's, especially at the end of the season!  I find things on sale and save them for the next season!  It helps save me a lot of money and allows my seasonal decorations to build up slowly each year.


My aunt gives me throw blankets as gifts and they always work perfect to add a festive feel to my living room!  A cozy kitty also makes for great decor too! haha!

Pumpkins are the best part of Fall decor!  The pumpkin candy dish was one of my first fall decorations.  This year, I received the teal pumpkins as a gift.  I also received the black pumpkin in this photo and the orange pumpkin in the first photo as a gift.  They came with gem decals and turned out awesome! 


The pumpkin warmer featured above is from Scentsy and is by far my favorite warmer!  It's currently warming Baked Apple Pie, for a nice warm and spiced aroma!


Sunday, November 13, 2016

Beachy Decor

Hello!  As many of you know, my living room has a relaxing beachy theme.  Today I'm featuring photos from my old townhouse to show a little insight to my crafting decor inspirations. These photos aren't "picture perfect" and I probably should have tidied up beforehand, but I still wanted to share!


Wednesday, November 9, 2016

Mermaid Warmer!

Hello!!! I had to show this because you all know how obsessed I am with mermaids!  Scentsy has a warmer that is perfect! What do y'all think?! 


Sunday, November 6, 2016

Pretty little stationary & Pretty little penmanship

Hello!  My newest interest is calligraphy!  I'm still practicing and trying to perfect my style.  I didn't realize how hard it is to write in a straight line without using lined paper! (lol)  I've always loved pretty stationary and I have a ton of it!  I thought it would be fun to make some holiday gifts by writing special quotes in calligraphy and of course, using calligraphy on my pretty stationary!  I'm going to have to limit my posts for the simple fact that a lot of the people I anticipate giving gifts to also read my blog, but here's a little sneak peek below!  


Monday, October 31, 2016

Happy Halloween!!!

Happy Halloween!!! I wanted to show everyone my super fantastic mermaid make-up for my Halloween Costume! 


My friend Jessica assisted me with my make-up.  Here's a quick run down of what she did!  I started with applying my normal concealer and foundation.  Jessica then applied an eye shadow primer to the areas of my face where I wanted the scales.  We placed a fishnet stocking over my face.  Make sure the fishnet is centered and they aren't too stretched out in any spots so that the scales are a consistent size.  She used shimmery purple and green eye shadow to fill in the scales.  We removed the fishnet and then she created a mixture of white glitter and white eye shadow to create a highlighter to fill in between the scales.  I did my eye make up and added bronzer and highlighter.  Jessica then attached my gems, pearls, and shells.  We used eyelash glue to attach everything and it worked perfectly! 


I was so impressed with Jessica's talents!  This is by far the best Halloween make-up I've ever had!!! Hope you all have a fabulous Halloween!!!


Sunday, October 30, 2016

Mermaid Tiara

Hello! Today's craft was lots of fun (and frustrating) to make!  I was inspired to make my tiara by a Pinterest post.  Unfortunately, mine didn't go quite as smooth as the Pinterest post, but I'm incredibly pleased with how my tiara turned out! 

What you'll need:
-Tiara
-Sea Shells
-Pearl Paint (I used Martha Stewart Brand)
-Crafting Pearls
-Hot Glue Gun
-Wood Glue
-Super Glue


The Pinterest post I found used a dollar store tiara, however I didn't like the selection at the dollar store, a lot of the tiaras were made of plastic and weren't going to hold up once the shells were attached.  I purchased my tiara from Walmart.  I made sure that the tiara had higher arches so that I had surface area to attach the shells.  I started by painting the shells. Once they were dry, I started gluing the shells on from the center out.  The glue situation was a little frustrating.  Hot glue was good for a quick fix, however, it wasn't holding up.  I ended up using both wood glue and hot glue. The wood glue provided a stronger bond over time.  I attached the tiny shells and crafting pearls using super glue.  I love the way my mermaid tiara turned out!  Hope y'all enjoy!!!

Sunday, October 23, 2016

Mason Jar Candle

Hello! Here's a fun little craft I found on Pinterest! 

What you'll need:
-Mason Jar
-Mod Podge (I used the spray not the glue)
-Glitter
-Battery operated Tea Light
-Ribbon


Spray the inside of the mason jar with mod podge (or you can coat it with glue). Add glitter.  I put the lit back on and shook the jar until the glitter covered the glass.  Then, simply add a tea light to the inside and screw the glass on top of the lid.  I added a little ribbon to match the decor in the room. Hope ya'll enjoy!

Sunday, October 16, 2016

Card Classes!

I've been attending monthly card making classes with a Stampin Up consultant.  Here are some of the beautiful cards we've made!